2.2 Controlling Media Objects
InqScribe provides a variety of ways to control your media objects. This page covers:
2.2.1 Controlling Media Playback
The on-screen remote control provides a set of buttons that will be instantly familiar to anyone who has used a VCR or a DVD player. These buttons provide the main mechanism for controlling media playback.
Each button has a tooltip explaining its function. The main (upper) row of buttons, from left to right:
- Skipback 5 seconds.
- Play, using the current play rate. If media is playing, this button functions as "Pause."
- Skipforward 5 seconds.
The secondary (lower) row of buttons supports, from left to right:
- Go to the beginning of the movie.
- Play fast in reverse. (Note that play rate does not affect this button.)
- Step backwards one frame at a time.
- Step forward one frame at a time.
- Play fast forward. (Note that play rate does not affect this button.)
- Go to the end of the movie.
The play rate controls (upper right, appears when you mouse over) let you adjust the speed of playback when using the play forward or play in reverse buttons. Normally, this is set to "1x", which means "play at 1.0 times the default speed." By changing this value, you can slow down playback (less than 1.0x) or speed up playback (greater than 1.0x).
For example, slowing down playback may allow you to transcribe more efficiently, because you won't have to pause the movie as much to catch up to the speaker. Conversely, speeding up the play rate can save you time if you are scanning a movie to try to find specific events.
The volume control (upper left) lets you adjust the playback volume. Note that this does not change the overall system volume of your computer.
Finally, note that everything you can do using the on-screen remote control can also be done using customized keyboard shortcuts.
2.2.2 Managing Media Time
You will typically work with time in two ways: inserting timecodes into your transcript, and using timecodes to jump around in the movie.
To insert the current movie time into your transcript, select the Edit > Insert Time menu item. This inserts the current movie time into your transcript wherever your cursor is located. Note that this menu item has a handy keyboard equivalent: control-; (Windows) or command-; (Mac).
You can also use the Edit > Copy Time to Clipboard command to copy the current time, if you want to paste it into another application. See Transcripts and Timecodes for more ways to work with timecodes.
Note: The format of the timecode can be customized in the Transcript Settings dialog.
To make the movie jump to a specific timecode, click on the timecode in your transcript. The movie will jump to that location.
Alternatively, you can use the Media > Go to Time... menu item to jump to an arbitrary timecode. This dialog also lists all known timecodes from your transcript, making it easy to jump to a position that you have already defined.
2.2.3 Customizing Media Appearance
To control the size of the movie, use the mouse to grab the splitter control that sits between the movie and the transcript (the cursor will change to a splitter cursor when you're in the right place). Then drag left or right to change the size of the movie.
You can also change the aspect ratio of the movie, e.g. to force it into a specific ratio like 4:3 or 16:9.
Note: Movies will usually open at 100% of their original size, unless they are large. InqScribe opens larger movies at less than 100% to ensure that there is a reasonable amount of space for the transcript. If you'd prefer to see your larger movie at 100% (or even larger), you can always use the View menu.
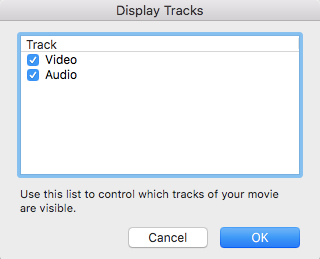
To control which tracks of a video are visible, use the Media > Display Tracks... menu item. This command opens the following dialog.
This dialog lets you turn individual tracks in the movie on and off. (Most videos are comprised of an audio track and a video track; some movies may include additional tracks such as a text track for subtitles.) These changes apply only to the movie while it is open in InqScribe.
For example, if you are transcribing a MPEG4 video on a relatively slow computer, you may find that turning off the video track (decompressing video is computationally intensive) increases the overall responsiveness of your computer.


