
3.5 Timecode Navigation
There are three main techniques for navigating chronologically though your media source, and one technique for ensuring that your notes for a given timecode are visible in your transcript.
Using the Timeline
You can always use the mouse to click on specific points in time on the timeline. Once you click, the media source will jump to that point in time. (The only exception is if you are viewing a real-time stream. Since it's real-time, it's not possible to jump around.)
You can also "scrub" around on the timeline by holding down the mouse button and dragging the mouse around the timeline. This technique is often useful if you are trying to find a specific visual event.
Clicking on transcript timecodes
Once you have entered timecodes in your transcript, you can use them as hyperlinks by clicking on them. This will jump to that point in time.
Using the Go to Time... dialog
You can also use the Media > Go to Time... menu item to open the Go to Time dialog. This dialog allows you to enter a timecode; when you click OK, the media source will jump to that time.
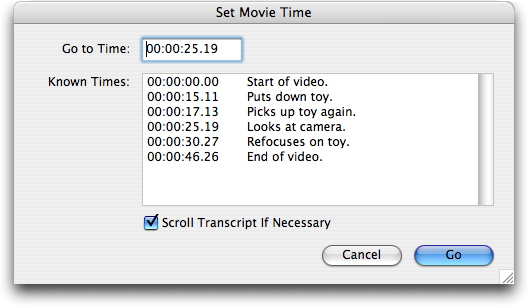
For convenience, a list of all the timecodes already in your transcript is provided. You can double-click on any item in the list to jump to that time.
The Scroll Transcript as Necessary button ensures that whatever time you jump to, the transcript will scroll so that the related timecode in the transcript is visible.
Showing the Current Timecode in the Transcript
Sometimes you're watching video and want to quickly pull up your transcript for the current point in time. Rather than scrolling through a long transcript, searching for the right timecode, you can use the Transcript > Sync Transcript With Current Time menu item.
This command does the search for you. It finds the timecode in your transcript that is closest to the current time. Then it scrolls the transcript automatically to ensure that this timecode is visible. Finally, it selects the timecode to make it easier for you to find it.