
1.2 Quick Start Guide
Just want to get started? This page is for you. In four steps, it walks you through the process of launching InqScribe and starting to transcribe a video file.
For help installing InqScribe: How do I install InqScribe?.
- Launch InqScribe
- Select a Media Source
- Use the Remote to Control the Movie
- Use the Keyboard to Annotate and Control the Movie
1.2.1. Launch InqScribe
 Double-click the InqScribe application to get started. The application loads, and the splash screen appears. Once the application is loaded, the splash screen goes away, and a new, untitled document window appears.
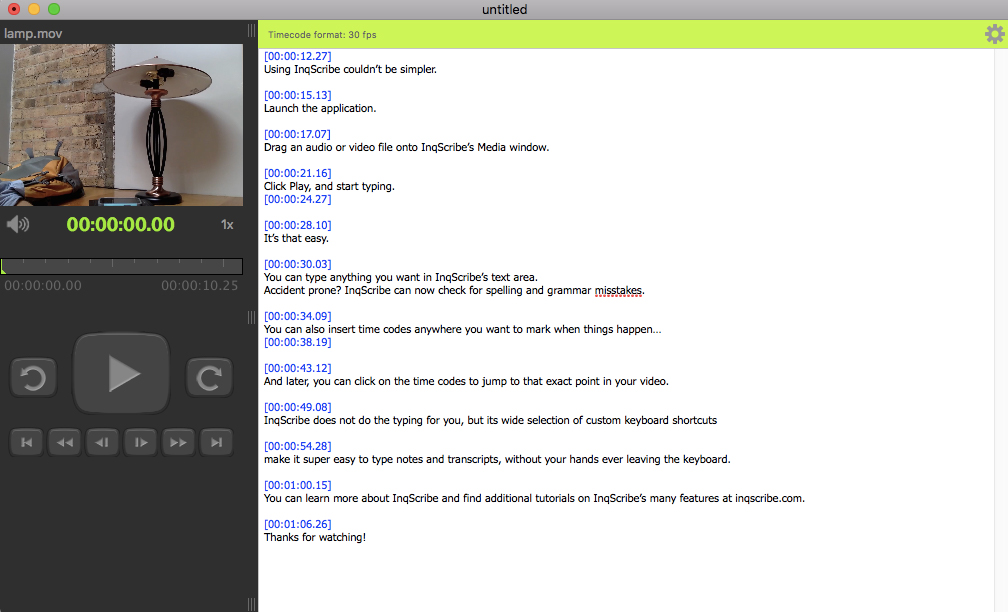
There are three basic components of the document window. The upper left section of the window is reserved to define and display the media file (you'll get to that next).
The remote control buttons in the lower left will be used to control the media. Since you haven't selected a media source yet, they are disabled.
The transcript itself takes up the right hand side of the window.
Note: You can click on all the small screen shots to open full-size screen shots in another window.
1.2.2. Select a Media Source
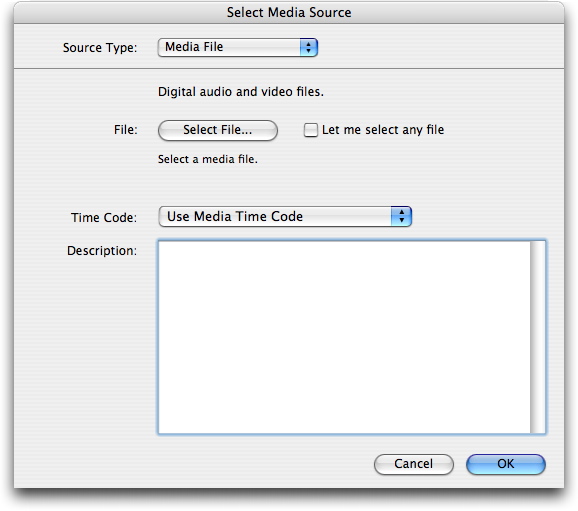 The first thing to do is to select the media source you'll be working with. Click the empty blue media window or the No Media Selected button in the upper left. This brings up the Select Media Source dialog shown on the right.
Every InqScribe document connects one media source to one transcript. A media source can be a file, a URL, a timer, or a physical videotape. InqScribe uses AVFoundation to control media files and URLs, but can't control tape decks, so you'll tend to be working with first two types.
Note that the Select Media Source dialog assumes that you're going to work with a digital media file, so Media File is already selected in the popup menu. If you wanted to work with a Media URL or an offline source (a physical tape or a timer), you would select the appropriate source type.
In this case, let's assume that you have a video file you want to transcribe. Press the Select File... button. This displays a standard "open file" dialog. Navigate through your hard drive (or networked file server) to find the file you want to work with, and then click Open.
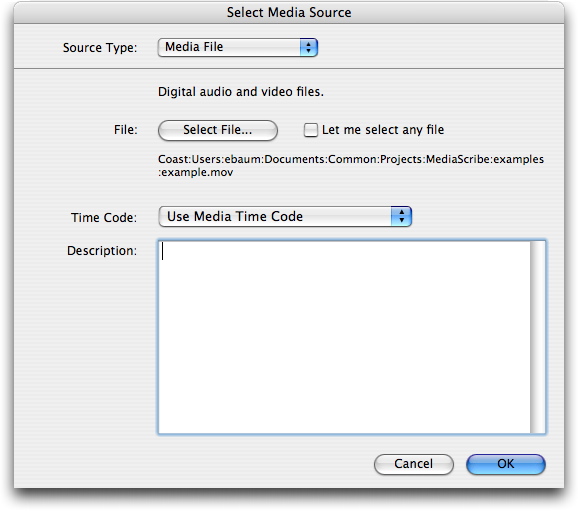 Your dialog should now look something like the one on the right. The full path name of your selected file is shown below the Select File... button.
For now, ignore the Timecode and Description fields. You can read more about them on the Selecting Media Sources page.
Press the OK button. InqScribe will now automatically load your media file.
1.2.3. Use the Remote to Control the Movie
 OK. Now InqScribe has loaded your media file and you're ready to go. Note that InqScribe may have resized the window slightly when it loaded the media file. InqScribe tries to show your video files in their default size. However, if the video is too large, InqScribe will scale the video when it's first opened.
Not to worry. If you need to change the size of the video, grab the splitter control located between the video and your transcript. Move this splitter left to make the video smaller and right to make the video larger. You can use the View menu to adjust the aspect ratio of the video, in case your source material uses non-square pixels.
Using the Interactive Timeline
 The first thing to note in detail is the interactive timeline.
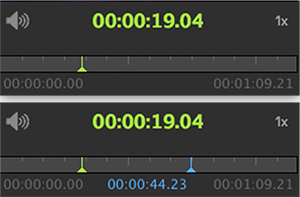
The timeline shows you the start time, end time, and current time of your movie. You can also easily jump to another location by mousing over the timeline. When you do so, a blue indicator tracks your position and shows you the precise time that you have selected.
Click the green current timecode to insert it into your transcript. Hover over the timeline and click to jump to that point.
You can also use the mouse to "scrub" through your movie. If you click and drag while in the timeline, you can rapidly move back and forth through the movie to find a specific scene or event.
Controlling Play Rate
 The second thing to note is the Play Rate control, located to the top right of the timeline, opposite volume control.
The play rate refers to the speed at which the movie will play. By default, this is the real playback speed of the media: 1x (the abbreviation means "1.0 times normal playback speed"). Hovering over Play Rate Control will allow you to select other play rates. There are quick access buttons to select 0.5x, 1x, and 2x.
Use the + and - icons to adjust the speed in 0.1x increments (tip: you can also use the mouse wheel while hovering). This is useful if you are transcribing and you need to slow down playback so that you can better understand what's being said, or so you can align your typing speed with the playback rate. Being able to control the playback rate makes transcription more efficient because you can transcribe longer sequences without having to pause the movie or back up and replay a section that went by too fast.
You can use any of the remote buttons to control the video. The play rate is honored when you use either the play forward or play backwards buttons. The fast forward and rewind buttons have preset speeds.
All buttons have tooltips describing what they do, so feel free to play with the controls. Next, you will start transcribing to get a feel for what it is like to work with InqScribe.
1.2.4. Use the Keyboard to Annotate and Control the Movie
Now that you're comfortable controlling the media, try inserting some timecodes. The basic model of use for InqScribe is that you will use timecodes as "bookmarks" into the audio or video sequence. Typically, you will insert a timecode and then enter any notes or literal transcription that relates to that time segment.
Note that this approach uses a single timecode to indicate the start of the time segment you're annotating. You don't have to enter an end time. (If you need explicit end times because you're planning to export InqScribe data into another program that requires them, InqScribe can automatically generate end times when you export your data.)
Inserting Timecodes
Inserting a timecode is easy. Select the Edit > Insert Time menu item or simply press control-; (Windows) or command-; (Mac). InqScribe will insert a timecode that looks like this:
[00:00:15.10]
 The timecode is inserted in SMPTE-format (hh:mm:ss.ff) and assumes 30 frames per second. (The number after the decimal point is the number of frames.) So this example time is equivalent to 0 hours, 0 minutes, 15 seconds, and 10 frames into the movie.
(If you need to work with timecodes, but not at 30 frames per second, you can. See Timecode Formats for more information.)
The brackets around the timecode are optional. You can also change the color used to show timecodes. Use the Preferences dialog to change these settings.
Add a few more timecodes until your transcript looks something like the one to the right. Often, transcripts start like this: you browse through the video, inserting timecodes at points of interest, with an eye to returning to those sections for closer study (or transcription) later.
Using Timecodes as Hyperlinks
Now you'll use the timecodes you've inserted to jump around a bit. You can think of each timecode as a little hyperlink. If you mouse over a timecode, your mouse cursor will turn into a pointer. If you click on the timecode, the movie will jump to that specific time. Try it.
You can learn more about using timecodes to navigate through your media source on the Timecode Navigation page.
Shortcuts: Pause and Skip Back
 You've already seen one keyboard shortcut: control-; (Windows) or command-; (Mac) inserts the current time into your transcript. But InqScribe also lets you define any number of custom keyboard shortcuts that you can use for controlling media playback.
The floating Shortcuts window shows all your currently available shortcut commands. (If the window is not open, use the Windows > Show Shortcuts Window menu item to open it.)
There are two highly useful shortcuts that InqScribe provides by default: Toggle Pause and Play and Skip Back.
Toggle Pause and Play is initially assigned to the tab key. This shortcut simply pauses the movie if it's playing, and plays the movie if it's paused. A simple command, but a useful one.
The Skip Back command is initially assigned to control-tab. When you press this shortcut, the movie will "skip back" 8 seconds. The current state of the movie (e.g. paused, playing, fast forwarding) will be preserved. Skip back can be extremely useful when transcribing; you can think of it as the "what did they just say?" button.
Note: The length of the skip back is customizable. By default, it's set to 8 seconds, but you can change that if you prefer a shorter or longer jump. You can even assign multiple skip back shortcuts, each with different durations!
If you're interested in reading more about how to define keyboard shortcuts, select Edit > Edit Shortcuts... or read more about keyboard shortcuts.
Snippets: Quick Entry of Common Phrases
 Another very useful feature of InqScribe is the ability to enter common phrases quickly. For example, if you are transcribing an interview, it can be very useful to have the names of the interviewer and the subject mapped to shortcuts.
We call these common phrases "snippets." The floating Snippets window shows all your currently available snippets. (If the window is not open, use the Windows > Show Snippets Window menu item to open it.)
InqScribe provides two example snippets by default: Interviewer and Activity. Interviewer will insert the current timecode, followed by the text " Interviewer: ". Snippets like this are extremely useful during transcription. Activity inserts a simple code that a researcher might use to denote a certain kind of activity. You can search for such codes later when reviewing the transcript, or import the text into another qualitative research package that can do more sophisticated analyses using such codes.
There are several ways to enter a snippet. If the Snippets window is open, you can select the snippet you want and press the Insert button. Alternatively, just double-click the snippet.
You can also assign a shortcut key, such as control-F1, to the snippet. In that case, just press the key to insert the snippet.
Finally, you can quickly activate the Snippets window, even if it's not open, by using the Edit > Insert Snippet... menu item. This command opens and activates the Snippets window. You can then use the keyboard arrows to change the selection, or type the first few letters of the snippet you want to select it. Then press Return or Enter to insert the snippet. Note that with this technique, the Snippets window will automatically close itself if it was hidden when you selected the menu item.
If you're interested in learning more about snippets, select Edit > Edit Snippets... or read more about snippets.
Learning More About InqScribe
That's the end of the Quick Tour. You now know how to create a document, define a media file, control the media, insert timecodes into a transcript, and use timecodes to move about a movie. That's all you need to know to be productive with InqScribe. Use the rest of this documentation to learn more about specific aspects of InqScribe.