
2.1 Selecting Media Sources
Every InqScribe document links a media object to a transcript. This page explains how to make that link.
2.1.1 The Select Media Source... Dialog
To define the media for a new document, press the Select Media Source... button in the upper left of the main document window, or use the Media > Select Media Source... menu item. Either action will open the Select Media Source dialog.
Once you have selected a media source, you can click on its name or icon in the upper left as well.
This page describes the main media types that you can use with InqScribe, as well as the main fields within the dialog.
2.1.2 Media Types
You use the Select Media Source dialog to select the media source for a particular document. There are three basic media sources, represented by the top three choices in the popup menu at the top of the dialog. To work with a particular media type, select it from the popup.
Media Files
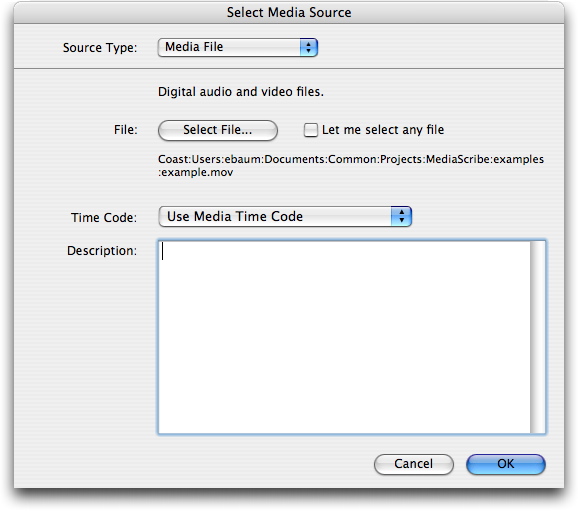 Use the Media File type to link your transcript to a digital media file that you can access on a local hard drive, a shared network server, or CD/DVD-ROM.
To select a file for use with InqScribe, click the Select File... button and choose the file using the standard Open File dialog.
InqScribe stores an alias to your file, which means that InqScribe can often find the linked file, even if you move it. If you link to a file on a shared network server (or a CD-ROM), you can send the InqScribe document to a co-worker who has access to the server (or a copy of the CD-ROM), and they will be able to view the media file as well.
Tip: Quickly Select a File
There is a shortcut for select media files. Simply drag the file into the main document window. This will select the file for you without opening the Select Media Source dialog.
InqScribe supports any kind of file that AVFoundation or Windows Media Player 11 is capable of opening. This means InqScribe supports most standard audio and video formats, including:
- QuickTime Movies
- H.263 and H.264
- MPEG-1, MPEG-2, and MPEG-4
- WAV, AAC, AIFF, and MP3 audio
- Most AVI movies
- Windows Media Files (.wma and .wmv)
Note that this is not a complete list, and what works and what doesn't may change as Apple and Microsoft update their platforms.
Tip: Unsupported File Types
InqScribe formally supports many media file types, including QuickTime, AVI, MPEG, MP4, MP3, WAV, and AIFF files. These files may be selected when you click the Select File... button in the Define Media dialog.
If you have an unsupported file, you may still be able to manually open it in InqScribe. For Mac users, click the Let me select any file check box before clicking Select File.... Windows users can simply select "All Files" in the open file dialog box. You will then be able to select any file on your hard drive, not just the files that InqScribe formally recognizes.
If there is a particular unsupported file format that you use regularly with InqScribe, let us know and we'll try to support it directly.
Media URLs
 Use the URL media type to link your transcript to a web-based media file. Please note that InqScribe requires a direct path to the hosted media file. Sorry, YouTube, Vimeo, and Google Drive links won’t work.
InqScribe supports the same range of audio and video formats for URL-based media that it does for file-based media. Note, however, that performance will almost always be better if you are working with file-based media. Performance of URL-based media is heavily dependent on the speed of your network connection.
In addition the http:// protocol, InqScribe also supports file:// URLs (which can used to refer to files on a local hard drive or on a server) as well as rtsp:// URLs (if you want to access media from a real time streaming server).
To define a URL media object, enter the complete URL (including the http:// prefix) in the Media URL field of the Select Media Source dialog.
Tip: Reloading Media
If InqScribe cannot access the URL, it will display an error message in the main window in the region where the video normally appears. You can try to reload the URL (e.g. after ensuring that you are connected to the internet) via the Media > Reload menu item.
Offline Media
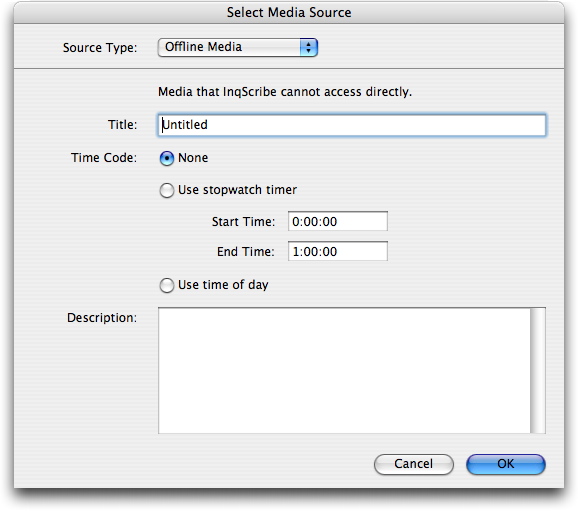 This is a catch-all category for physical tapes (audio, Hi8, 8mm, DV, etc.) or events that you want to review. Although InqScribe cannot control playback of these tapes, it can provide a means to enter timecodes while you watch the footage on a TV monitor (or watch an event in real time).
When you select an offline media source, you can define a timeframe for that source. There are three kinds of timeframes:
- None. InqScribe doesn't try to track time at all.
- A stopwatch timer. InqScribe will keep track of time within the values you define. This timeframes behaves very much like a media file would: you can change the time, pause, resume, etc.
- A real-time clock. This lets you enter the current time into your transcript whenever you use the Insert Time... command. This is useful for taking notes during live events.
2.1.3 Media Fields
Beyond the specifics of each media type, there are two additional pieces of information that you can store about the media object you select.
Start Time represents the starting time of the media object in SMPTE format. Normally, this is set to 00:00.00. However, there are occasions when you will want to change this value to something else.
For example, some video cameras will burn the current time of day onto every video frame that you shoot. Imagine you have a video clip like this, where you started shooting at 2:30 in the afternoon and shot for about a half hour. After you convert that clip to a MPEG file, the time is still visible.
Now you start transcribing and inserting timecodes into your transcript. Wouldn't it be nice if those timecodes could align with the visible time on the video, and run from 2:30:00 to 3:00:00, instead of going from 00:00:00 to 00:30:00?
That's where the start time comes in. In this case, you would set the start time of the media object to 02:30:00. This will make all inserted timecodes, as well as all displayed times in the timeline, be relative to this start time.
For Media File sources, you'll see a Timecode label, with a default value of "Use Media Timecode". If you work with QuickTime media that has its own embedded timecode, this tells InqScribe to use the embedded timecode instead of starting at 0:00.00. If you'd prefer to set the start time yourself, change the popup menu to "Start at Custom Time" and enter a time value.
Tip: Timecode Format is HH:MM:SS.FF
Note that there is a period, not a colon, separating seconds and frames. If you've entered a start time and it looks like InqScribe is off by hours, it's probably because you entered MM:SS:FF instead of MM:SS.FF.
Second, the Description field provides a general purpose area for storing notes about the media object that you want to include. These could include notes about the compression format used for the video file, or which box you filed the original tape in, or the date and time and subjects represented in the video. It's entirely up to you.