5.1 Importing Data Overview
InqScribe is designed to work with other applications that you use to analyze research data. An important aspect of this is the ability to import data from other applications.
InqScribe can import data in three general formats:
InqScribe can also import one third party format:
5.1.1 How Imported Records are Converted to a Transcript
When you import tab-delimited or XML data, you are importing a set of records that can contain up to four pieces of information per record.
- Start time
- End time (optional)
- Speaker name (optional, but if it is included, end time must also be included)
- Text
InqScribe is pretty good about determining how many of these fields are present and importing them properly. See the descriptions of the specific data formats for more details about how structured data is imported and formatted.
Note that imported timecodes will be formatted based on your transcript settings.
InqScribe will remember your Import settings on a per-document basis until you quit the application. Import actions are also undoable. Together, this makes it a bit easier to experiment with different import settings.
5.1.2 Import Settings Dialog
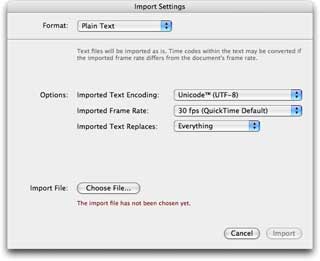
Use the File > Import menu to select the format that you would like to import. Once you've made your selection, a dialog box appears.
Format
Defines whether the imported file is a plain text file, a tab-delimited file, or an XML file.
Imported Text Encoding
By default, InqScribe assumes text is encoded using UTF-8. UTF-8 is a superset of ASCII and works in most cases. If you know that your text was encoded in a different way, you may select a different encoding from this popup menu.
Note: InqScribe will import UTF-16 encoded text properly as long as a BOM (byte order mark) is present. If there is no BOM, InqScribe assumes the text is encoded in big endian order.
Imported Frame Rate
It's not always safe to assume that you are importing text-based timecodes that use the same frame rate as your transcript. This setting lets you account for the timecode frame rate of the imported text.
For example, if you were importing text containing timecodes that you know are PAL- or NTSC-based, select that choice.
Imported Text Replaces
This setting lets you decide whether the imported text should replace everything in the current document, or only replace the current selection. If you want to add imported text to an existing transcript, replacing only the existing selection is the way to go.
Speaker Delimiter
If you are imported tab-delimited or XML data that includes a Speaker field, you can use this setting to control the text that will appear between the speaker and the text of the associated record.
Typically, this value will be something like ": ". As an example, if you are importing data where the speaker is "Abe" and the text is "Fourscore and seven years ago", InqScribe would use the speaker delimiter setting to add the following to your transcript.
Abe: Fourscore and seven years ago
This setting does not appear when you are importing plain text.
Place Timecodes on Separate Lines
If this setting is checked, then imported timecodes will always be placed on their own lines. Here is an example of importing text with this setting checked.
[00:00:00.00]
Abe: Fourscore and seven years ago
[00:00:05.00]
And here is an example where the setting is not checked.
[00:00:00.00] Abe: Fourscore and seven years ago [00:00:05.00]
This setting does not appear when you are importing plain text.
Import File
Use the Choose File... button to select a file to import. The path to the file will be displayed below the button.

