4.2 Snippets
Snippets are short bits of text that you find yourself typing into your transcript over and over again. Snippets may contain variables. InqScribe lets you define snippets and gives you a variety of ways to enter them quickly.
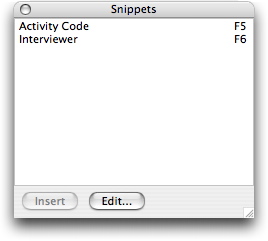
The Snippets window shows all currently defined snippets.
Inserting Snippets
There are several ways to enter a snippet. If the Snippets window is open, you can select the snippet you want and press the Insert button. Alternatively, just double-click the snippet.
You can also assign a triggering key, such as F1, to the snippet. In that case, just press the key to insert the snippet.
Finally, you can quickly activate the Snippets window, even if it's not open, by using the Edit > Insert Snippet... menu item. This command opens and activates the Snippets window. You can then use the keyboard arrows to change the selection, or type the first few letters of the snippet you want to select it. Then press Return or Enter to insert the snippet. Note that with this technique, the Snippets window will automatically close itself if it was hidden when you selected the menu item.
Editing Snippets
To edit snippets, click the Edit button, or use the Edit > Edit Snippets... menu item.
- Use the Add button to create a new snippet.
- Use the Edit button to edit an existing snippet.
- Use the Remove button to remove an existing snippet. You can hold down the alt key (option key on Mac) to skip the confirmation dialog.
- Use the Reset to Defaults button to reset the snippets (and shortcuts) to InqScribe's default settings.
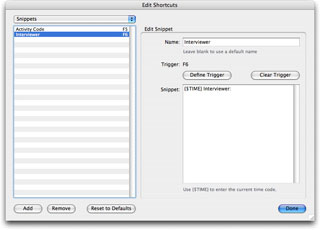
When you select a snippet in the dialog, the right hand side of the window updates to show the snippet's current properties.
Name
InqScribe generates names for snippets automatically. But you can enter your own name for a snippet if you prefer. (Note that snippets are always sorted alphabetically.)
Trigger
The trigger is the key combination (F1, control-shift-P, etc.) you set that will insert the snippet. Click the Define Trigger button to define the trigger for a snippet. Click the Clear Trigger button if you want to remove the trigger from the snippet. (Note that snippets don't have to have triggers. There are other ways to insert them.)
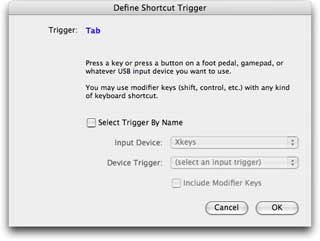
When you click Define Trigger, this dialog appears.
Press a key combination to set the trigger for your snippet. You can also use USB input devices like foot pedals or gamepads. Just press the button or pedal on the device to set the trigger.
When you've defined a trigger, click the OK button. (Note that you can't use the keyboard to click OK; InqScribe might think you're trying to define a trigger.)
There are some limitations on the kinds of keyboard combinations you can use as snippet. Those limits are described here.
Windows Trigger Limitations
- Existing system-wide hotkeys (e.g. print screen) may not be used.
- Avoid key combinations that are already mapped to menu items, like control-; or control-O. Such combinations will trigger both the menu item and the shortcut, which probably isn't what you want.
Mac OS Trigger Limitations
- Existing system-wide hotkeys (e.g. Exposé) may not be used.
- Avoid F1-F4. These are automatically mapped to Undo, Cut, Copy, and Paste.
- Avoid key combinations that are already mapped to menu items, like command-; or command-O. Such combinations will trigger both the menu item and the shortcut, which probably isn't what you want.
- Avoid key combinations that are used to enter accented characters (for example, option-u, option-e, option-a). These combinations are handled by the OS in a special way, and while InqScribe can detect them, InqScribe cannot prevent them from also being typed into your transcript.
Snippet
Enter the text of the snippet in the field. The text will be inserted as you type it.
Note that there you can include any number of special variables within the snippet text. For example, if the string "{$TIME}" appears in your snippet, it will be replaced with the current timecode when you insert the snippet into your transcript. Learn more about variables here, or see a complete reference of all known variable names.


